Describing a screen in words and checking the code afterwards is slow. In Styx you can have an agent draw the screen first, change it by pointing at it, and then hand the finished design to a build task that writes the code. When the design changes later, the build is told. This guide goes from an empty Design tab to a landed feature.
The example is a checkout page with an order summary and one Pay button.
Start a design task
- Open the Design tab. In the project's workspace, click Design. With no design yet, it shows Design it before you build it.
- Describe the screen. For example: "A checkout with an order summary on the right and one Pay button. Desktop and phone." Pick the agent and click Start a design task.
- Let it draw. The design task is a task like any other, with its own branch and its own chat. Its agent writes
each screen as a plain HTML file under
.styx/designs/in its worktree, at desktop (1280 px), tablet (834) and phone (390) widths, and the canvas shows them as they arrive.
You can also start one from the Tasks tab: in Start another lane alongside, choose Design ("Screens first, in wireframe or hi-fi") instead of Build.
Iterate on the canvas
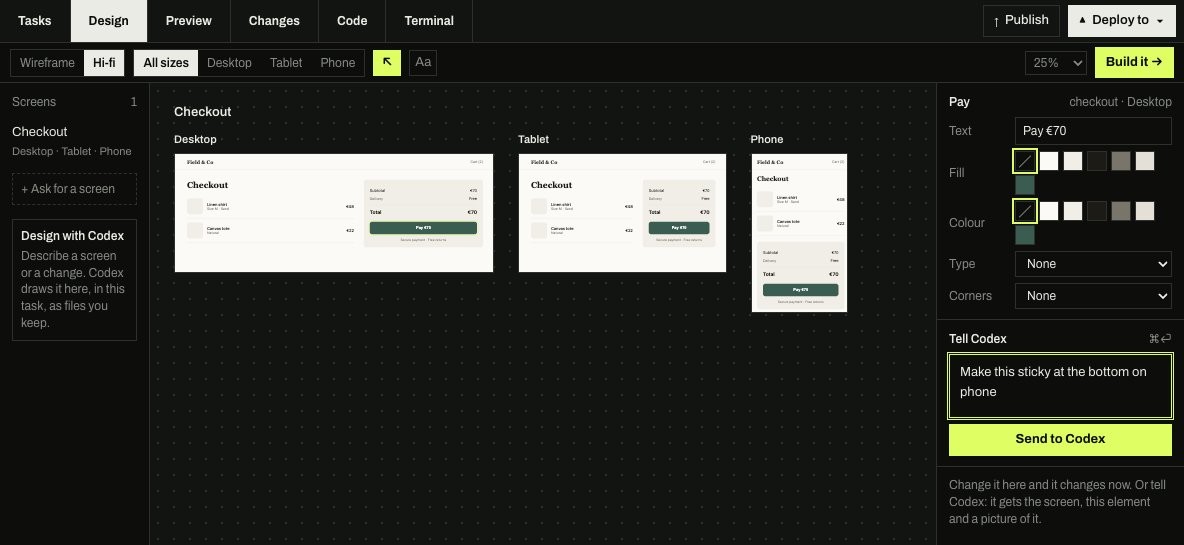
The toolbar switches between Wireframe and Hi-fi, and between All sizes and a single size. The Screens list on the left has + Ask for a screen to add another one.
To change something, point at it rather than describing it:
- Select. Press V or click the arrow tool. Click an element to pick it, or drag over an area to pick a section or several elements at once. Esc clears the selection.
- Change it yourself, for small things. The inspector edits Text, Fill, Colour, Type and Corners. The change shows at once and is saved to the screen's file.
- Or tell the agent. Type what should change in the Tell box and click Send to the agent, or press ⌘⏎ (CtrlEnter on Windows and Linux). The agent gets the screen, the exact element and a picture of it, so "make this sticky at the bottom on phone" is enough.
Click Aa for Type and colour: the design's colours, heading and body typefaces, type scale, corners and spacing. A change here applies to every screen at once. It is saved as the design's tokens, which the build uses later.
The screens are drawn in a locked-down frame: no scripts run and links don't go anywhere, so a design file can't do anything but display.
Hand it over with Build it
When the design looks right, click Build it. The dialog, Build these designs, asks:
- New build task (its own branch, cut from this design, with the agent you pick) or Build here (the design task carries on and builds it).
- Which screens to build, whether to pass on Type and colour, and an optional Note for the build, such as "use our Button component".
Click Start building. Styx commits the design files on the design task's branch first, so the build starts with them. The build agent is asked to match each screen at the sizes drawn, using the app's own stack and components. The design files are a reference, not code to copy. On the Tasks board the two cards name each other: From design on the build card, Being built by on the design card.
When the design changes
You can keep working on the design while the build runs. When the design changes, through a hand edit, Type and colour, or an agent turn that redraws a screen, Styx commits the change on the design branch and tells each build task what changed. The build agent brings the new design into its branch and updates the code to match. The design card reads Design changed · told the build task and the design chat records it.
Polish in Preview with Select to fix
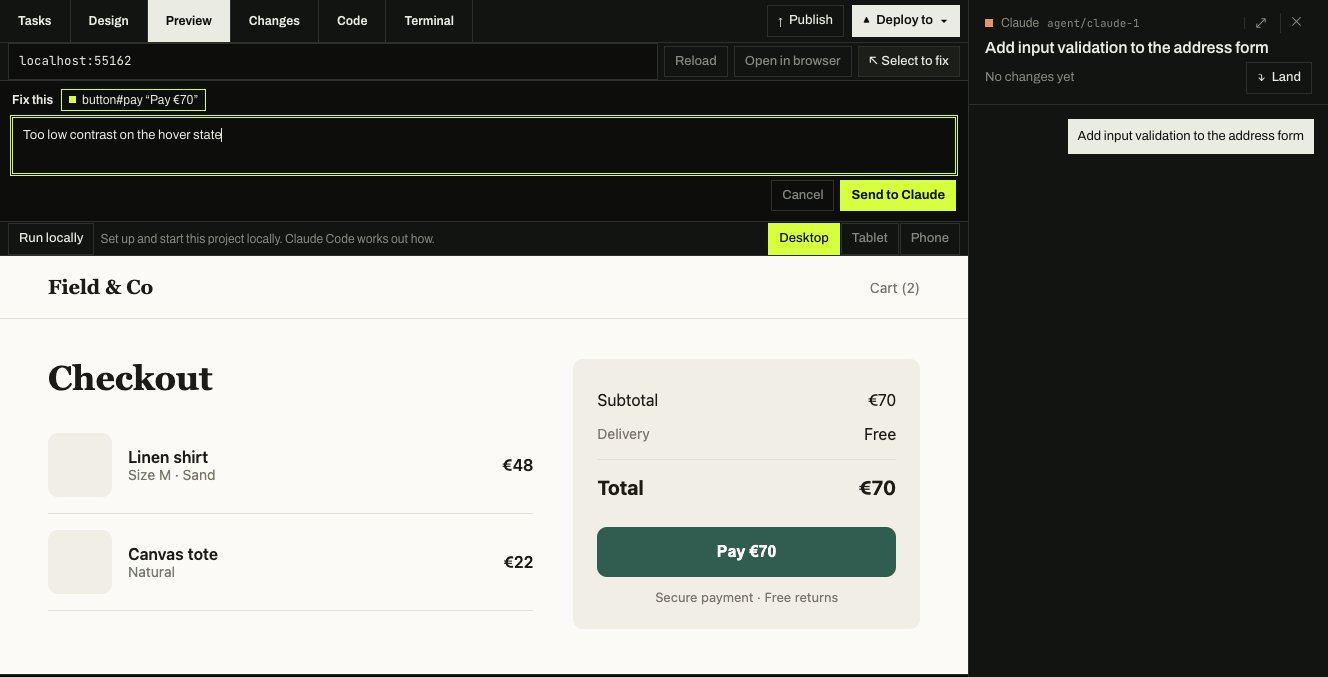
- Run the app. Open the build task and click the Preview tab, then Run locally. The first time, the
agent works out how to start the project and Styx remembers the command. If you already run a dev server, type
its local address instead (Preview shows
localhostand127.0.0.1only). - Point at the problem. Click Select to fix, then click an element in the running app or drag over an area.
- Say what's wrong. The Fix this box opens with the element named. Type the problem and click Send to the agent. The note goes with a picture and, where the page exposes it, the component and source file.
- Send design problems back. If the fault is in the design rather than the code, tick It’s a design problem: tell the design task and the note goes to the design task instead. The fix then reaches the build the same way as any other design change.
More on both tabs in Design and Preview.
Land it
When the build is done, open its Changes tab to read what each turn did, then click Land. The build branch
was cut from the design branch, so the screens in .styx/designs/ land on main with the code and stay in the repo
as the record of what was intended. See Land, publish and deploy.