This tutorial takes one change from a sentence to a commit on main. It takes about ten minutes, most of it the agent working. You'll start a task, answer the agent when it needs you, review its work turn by turn, and land it.
Before you start
- Styx is installed.
- One agent is set up: Claude Code, Codex, Gemini CLI or Cursor's agent, installed and signed in. Settings › Agents lists every agent Styx found, its version, the account it's signed in as and whether it's ready. If none is, see Connect your agents.
- Your project is a git repository. Without git an agent can still work, but directly in your project folder, with no branch of its own and nothing to land.
Add a project
If you picked projects during setup, they're already on the rail down the left of the window. To add one now, select + (Add project) below the project tiles and choose:
- Add from recent…: your editor's recent folders, folders where Claude Code and Codex have worked, and repos found on this machine.
- Open folder…: any folder on disk.
- Clone URL…: clone a repo, by default into
~/code(C:\devon Windows). - New project…: start from an empty folder, a template, or a brief an agent scaffolds.
The same four choices are under the project table on All projects.
Start a task
-
Open the project and choose New task. Select the project's tile on the rail, then + New task in the project's nav, or press ⌘⇧N (CtrlShiftN on Windows and Linux).
-
Say what you want done. Describe the change in a sentence or two, the way you'd ask a colleague. Type
@to reference a file. If you'd rather warm up first, pick one of the starters underneath, such as Explain how this project fits together, which reads the code and changes nothing. -
Pick the agent and start. Choose the agent from the row of agents under the box, then select Start or press ⌘⏎ (CtrlEnter on Windows and Linux).
Styx cuts a new branch for the task, agent/claude-1 for a first Claude task, in its own copy of the repo, and starts the agent there. Your main folder doesn't change; as the New task screen puts it, main is safe until you land it.
The fields under the box are already filled in and you rarely need them: where the task works (New from main), its branch name, Permissions, Model and Effort for agents that take them, and three toggles: Auto-approve edits, May request targets and Notify when it needs me. New tasks start in the Auto permission mode. Each agent applies it its own way: Claude Code decides what needs your approval, Codex uses its own reviewer, Gemini CLI makes edits without asking but asks before commands, and Cursor's agent asks for both. The hint under Permissions says what the selected mode does for the selected agent.
Design or build
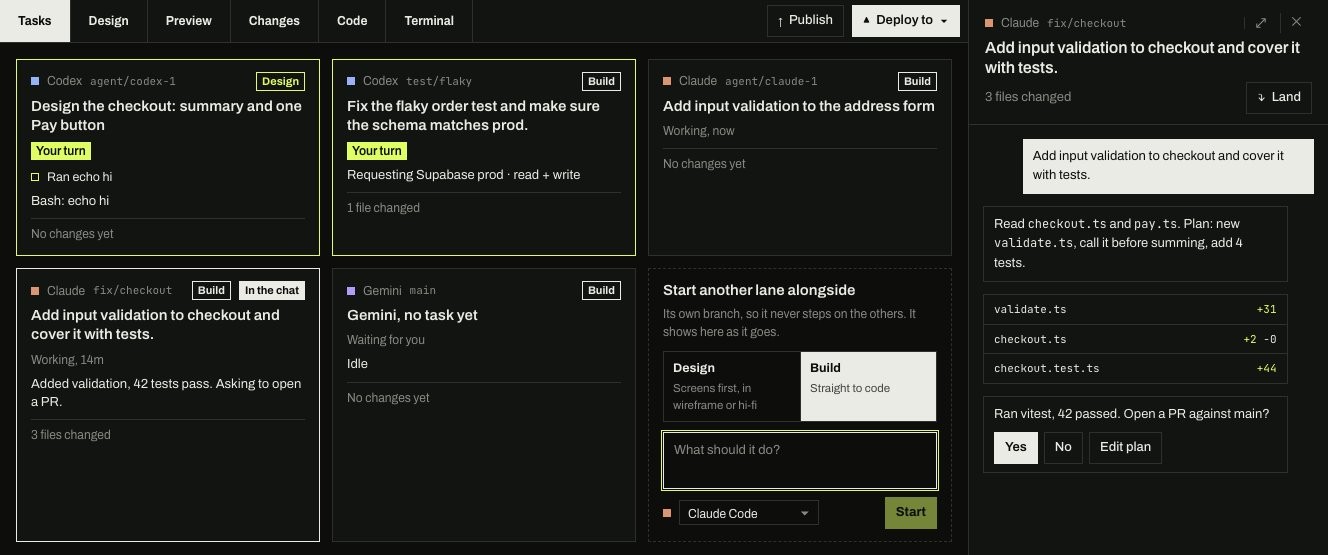
New task starts a build task: straight to code. To draw the screens first, start the task from the Tasks tab instead. Its last card, Start another lane alongside, asks Design it first, or build it.: Design draws screens in wireframe or hi-fi on the Design tab, and Build goes straight to code. A design task hands over to a build task when the screens look right. See Design.
Answer when it asks
While the agent works, its steps read in plain words in the chat (Read a file, Edited a file, Ran a command), and its row in the project's nav says Working with how long. When it needs you, the row says Your turn, the count of what needs you goes up, and on a Mac the Dock icon shows a badge.
Everything it needs from you comes into the chat, and you answer it there:
- A question. Pick an answer, or write your own, and select Send answers.
- A plan. In plan mode the agent shows Plan ready for review; select Approve or Reject.
- Access to a deploy target. Select Review request to see what it wants, on which target, and why, then grant it for a set time or Deny. See Approve a request.
You can also just talk to it. A message you send while it's working isn't lost: Codex takes it straight away, and the other agents get it when the current turn ends.
Review what it did
Open the Changes tab. It reads the task as one page: what the agent did, turn by turn, each turn with its diff.
- Undo this turn takes back the changes that turn made; later turns and your own edits stay. Styx asks first (Undo it or Keep it), and waits until the agent has finished its turn.
- Ask for changes puts you in the chat to tell the agent what to change.
- Review hunk by hunk opens the review screen, where you can Revert a single change and keep the rest: j and k move between changes, r reverts one, and ⌘⏎ (CtrlEnter on Windows and Linux) finishes.
Building something visual? The Preview tab runs your app inside Styx. Use Select to fix, click what's wrong and say why: the agent gets the element and a picture of it. See Preview and Select to fix.
Land it on main
When you're happy with the work, select Land, at the foot of the Changes page or in the task's header above the chat. The Land dialog shows a summary of the task, drafted by the agent from its changes. Edit it if you like, since it becomes the record on main, then select Land.
Styx then:
- commits anything the agent left uncommitted,
- brings the latest main into the task's branch (if that hits a conflict, the agent resolves it first),
- runs your project's checks, when Styx knows them, and stops if they fail,
- merges the branch into main with your summary,
- pushes main, if the project has a remote.
Styx learns your checks command (such as pnpm typecheck && pnpm test) the first time an agent finishes resolving a merge conflict in the project: the agent works it out, and Styx remembers it from then on. Until then, Land merges without running checks.
Changed your mind? Undo landing is on the task's row in Lanes and branches until main moves on.
Prefer a pull request
Select Publish, in the strip of tabs above the workspace, instead. It commits, pushes the branch and opens a pull request in one step (or stops after Commit only or Commit & push), with a message the agent drafts from the diff. Publishing needs a remote; if the project has none, Connect to GitHub in Lanes and branches creates one or points Styx at an existing repo. See Land, Publish and Deploy.
Where to go next
- Connect a target, so an agent can ask to deploy or touch a database.
- Run two agents on one feature, side by side, without them stepping on each other.